Its been a long time since I last posted.. say about 3yrs or so. Recently my wife and I purchased 14 acres of land. One of my dreams has been to build a timber frame house and shop.
In order to see the full picture you may need to click on it.
Our plan is to build a shop first, so that I can empty out all my tools from my current garage - its not like its completely filled, I mean I can still get between equipment if I suck in my stomach and squeeze through. Honestly, I've outgrown it and I think I've outgrown the neighborhood I live in - big HOA fees and some of the highest water bills in the country.
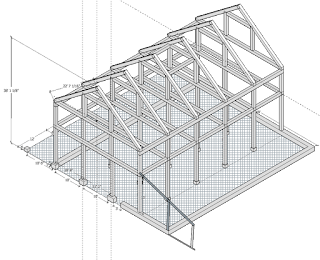
I started designing a timber frame shop a few months ago. First it was going to be a shop that would cover all my hobbies - wood working, machine shop and tinkering on my cars. I drew up a lot of plans and worked on a dozen different designs. Then we got thinking, hey why not have a living space above it in the loft. That put a couple of constraints on it. In the neighborhood we are moving there is a minimal living space of 1700 sq ft. That required expanding building and it grew and grew. Friends of ours got quite upset, too many stairs to climb as we get older (2nd floor was 15' up). The shop was going to be 36'x64' with 12' lean-to on both sides and an extension for porch on the one lean-to. Here is a partial drawing of the frame.

In the end, I went back to the drawing board at Christmas and started over. Looking at what I wanted for the woodworking shop and the machine shop. I started with a 32'x36' woodworking shop with a 16' lean-to off the one side for the machine shop. This accounted for the insulated space. Then I added a second lean-to uninsulated for storing stuff out of the weather. This design was neat but it required a 16' span between posts and that didn't appear to be a recommended spacing - unless we used really thick beams. Finding large diameter pine's locally wasn't going to be easy.. the smaller the beams the better.
We decided that we wanted to pursue putting a living space up there - at least for short term living while we sell our current house and build our final home. That could be a year it could be 10yrs. The rationale for the apartment even if we only lived there 2 years while building the main house, is it allows us to have a place for the kids to come home to. Eventually one or more will get married and visit and we aren't going to build a main house much bigger then the minimum required of 1700 sq ft. Thus having this additional living area for the kids when they come home or family visiting from out of town is really appealing to us.
Back to the drawing board.
This time I changed the layout to 36'x36' for the main shop area and 14' lean-to off the side. This basically allows 12' spans (exception being the lean-to) and that is one of the recommended spans. The age old question - what to do with the second floor reared its head once again. Because the shop was intended for woodworking and not for automotive the ceiling is much lower. The added width gives more space into the kids bedrooms and dining area. After a lot of discussion, start overs and redesigns I came up with the following floor plans and frames.
The first thing to note is both lean-to are now insulated, the one will be the machine shop, the other side will be an exercise room, office space *away* from the kids to reduce noise and stress when I work at home. Plus no heavy desks to cart up stairs and plenty of space to store those things that will not fit in the 1296 sq ft apartment. As this is intended to be temporary, the office area will be designed in such a way as to have a garage door framed in on the one end, then filled in for a windows for the time being. When we move into the real house, that area 14'x36' will revert to a storage shed for lumber and a tractor. We also corralled off 12'x36' of the shop into a laundry, a second 3/4 bath and large front foyer (mud room).
Yes, we are building on a slab - its meant to be a shop long term. Not a house. I absolutely detest crawl spaces and we can't afford to put in a basement and again, its meant to be a shop.
Main floor plan - left side is the exercise room/office area. The main section is the woodworking shop and the right side the machine shop and utility room, etc. The one important feature is the straight through doors that will allow materials to pass right through the building if needed.
Second floor
The kids rooms are a little tight and lack closets at present. Part of the issue with the closets is that the wind braces in the frame force the door a little bit away from the post. If we can come up with a solution that allows the door closer to the post then a small closet could be placed at the end of the bed. We may remove that divider between the rooms later and make it a bigger bedroom. It would probably be best that this go down to a single bedroom with a bonus room to keep the septic constraints realistic. So we may not put a closet in there and we may design the partition to be removable at a later date.
One of the headaches with a post and beam construction is designing around the posts and designing such that electrical, mechanical and plumbing systems are not visible. You will note that the downstairs bathroom and laundry align directly below the kitchen and and the upstairs bathroom. This allows us to put a drop ceiling in the downstairs bath and laundry to hide the upstairs plumbing. I'm contemplating perhaps laying down the subfloor on the 2nd floor, then doing a 2x4 frame-up on top of that to put in some sound insulation to cut down on shop noise as well as making it easier to run ceiling lights in the shop vs. having exposed wiring. But I need to talk to the engineer first and see if it even is possible and what if any the drawbacks are.
We hope to hide the bulk of the electrical in the framed interior and exterior walls. The exterior is simply an enclosure for the timber frame, it is not structural. Theoretically one can use much larger spacing on studs and even use 1x material instead of 2x. While most new timber frame construction would use SIP panels for the shell, - for maximum R-Value and air tightness, they are just way too expensive for this build - unless we decide to change up and get a large construction loan.
The funny thing with the kitchen, my wife actually gained both counter and cupboard space over her current kitchen. Though it is a gallery kitchen but should be room for two people to work easily in there.
I drew up the actual frame in Sketch Up.
ISO View
Front View:
Side View
Back View
The front view lacks the porch, its on the back of the house depending on your view of the front vs the back of the house. The side that anyone would enter is actually shown as the front of the house and faces somewhat towards the east. The back of the house faces somewhat towards the west and what little sunset we will get.
When I'm working, I like to take a break, sit outside the garage in a chair and stare off at the distance. Currently that means stare at the road and the house across the street. If its raining.. well can't sit out there. In this building, sitting outside the back door will mean sitting under a covered and possibly screened in porch. I might even make a couple of rocking chairs and get an old whiskey barrel to lean my shotgun against... maybe I'm getting too rednecked.
We probably should put a little overhang outside the main entrance as well, where people come in. But this porch is my porch.
I have a professional engineer lined up to review the above drawings over the next couple of weeks and tell me whether any of what I have designed will even work. He will probably want to shoot me over the porch, it was a late addition to the drawing and I was trying to avoid having it hit the main posts at the same intersection as the tie-beams and joists.
There will be an unfinished loft area over the bedrooms and kitchen. The great room will be exposed to the cathedral ceiling. We chose to put a ceiling in over the bedrooms and kitchen to keep things simple. I really do not want to extend walls in the bedrooms etc all the way to the roof. Someday maybe we finish it off, but for now it will be strictly for storage.
We plan to use in floor hydronic radiant heating - basically PEX water lines with 85 degree F water running through them. We may eventually put in an outdoor wood furnace/boiler to reduce our reliance on electricity or propane to heat the house. We have 7 acres of woods to get deadfalls from etc. That and lots of off-cuts from building two timber frame houses another garage, chicken coop and maybe a small barn for a cattle beast that can keep our front field (5 acres) mowed. Its also possibly to use some solar water heating tubes depending on whether we build too close to the trees or not.

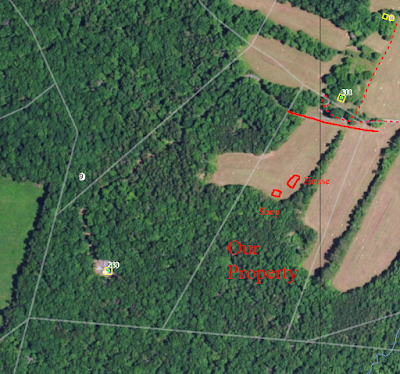
We have plans for a small orchard and large garden along the western property boundary. The left side of the picture above. The property boundaries are very rough and inaccurate in the picture above. The solid red line at the top shows the north end of our property. The lines up there are completely out of whack. Also the property is a bit more shifted to the left at an angle. That strange green dot in the adjacent property is a cell tower. Completely invisible to us but excellent cell reception. The property is supposed to have access to fiber optic internet and fiber cable runs in the easement at the front of our property.
We plan to run our driveway down the right side of that pointed tree line in the middle of the property then cut over to the other field. Since it appears the true property line is much closer to that tree line there should be just enough room for the driveway. The corners of the property are well marked, the problem is its impossible to see from the back of the property to the front - 1300-1400 ft through trees.
The current plan is to work in phases. Because it will be a residential building (at least initially) and I expect for a number of years. It will have to go through the design with the professional engineer. We will need to design the septic system and get the septic and well permits in hand before we can get the building permit. The neighborhood has an architectural review requirement so that has to happen first before we go too much further.


