Wednesday, June 23, 2010

Receptionist Desk Part II - Milling the rough lumber

It has been awhile since I've done a post. I had to work a significant amount of overtime at work and the amount of time I had available to putter out in the garage was significantly reduced. A couple of weeks ago, my sons and I started sorting through our stock pile of wood. Since the desk has a great deal of narrow and reasonably short pieces we decided to begin by utilizing some of the less desireable boards in the pile. By desireable I mean that these pieces had a lot of defects that would prevent longer and wider pieces from being utilized but would yield a good number of decent pieces for the rails and stiles required to build this desk.

We spent awhile sorting through the boards and estimating the various cuts to try and see what we can come up with. We chose a couple of really clear boards for the counter top around the top and a couple of boards that looked really clean for the desktop.


Over the past couple of Saturdays we've been working through the cut list and jointing and planing the boards required leaving them slightly oversized in all 3 dimensions to allow for some tension release. Tonight Johannes and I finished cutting them to width and thickness. I had hoped to use 7/8" thick material but a few stubborn boards would not cleanup until we reached 3/4". There are quite a few boards that are showing significant rayflake so the desk should really turn out very nicely.


We also began working on the desktop. We began with 4 boards approximately 9" to 9.5" in width. After jointing and trimming the outside edges and removing most of the sapwood and as many defects as possible, we were left with a 33" wide top. The final top is supposed to be about 32" in width. We will lose a bit more as we cut the glue joints. So the final dimension will probably be reduced to closer to the final dimension of 32".


The hardest part about working with rough lumber is that there are times that you can't really see all the defects until after you begin to plane the lumber. I chose two boards that had clearly come from the same tree in hopes that they would match up in color and characteristics. The tree must have had a mineral streak or discoloration in the wood. I wound up with a bookmatched dark streak in two of the boards. You can see the defect in the upper right of the image. The other dark areas especially in the foreground of the image are the result of the beginning of a crotch in the tree. There are a couple of other defects, one knot near the top center of the image and one in the foreground left. The foreground left will be removed when we trim the top to length (its a few inches over length right now). The other is removeable only if I narrow the desktop by an extra inch. The other option is to leave it, perhaps fill it with epoxy to level it to the desktop. I've done this a few times - once on my daughter's pencil post bed and again on the sofa.

Well that's it for tonight.

Tuesday, June 8, 2010

Receptionist Desk - Intro

A month or so a friend of mine asked me if I could make her a new desk for her receptionist, unfortunately she also didn't have a real budget for it. I agreed to do it, provided they covered the cost of materials to a maximum of ~$400.00. The desk will be a bit different then a normal desk. It needs to have a wrap-around shelf/ledge at standing height in order for clients to fill in paperwork while protecting the receptionist's monitor and providing at least some level of privacy for the receptionist.

I was given free-reign on coming up with a design. Despite the fact that this will largely be a voluntary effort in terms of my time, I didn't just want to slap together a plywood box and call it done. I visited the office about a month or so ago, but their wasn't much in terms of inspirational furniture in it - the current furniture is a rather hodge-podge collection of mismatched chairs, and a small sofa that has seen its better days. Even the inner office lacked any cohesive furniture style. There was however, at least one thing that did inspire me. The building the office is in is very old and part of the historic downtown Palmyra and across from the old courthouse. The interior design of the building retains some of the historic characteristics in the woodwork on the inside. There were one or two old pieces of furniture - a desk/table in the craftsman style as well.

The design had to incorporate both a desk and the wrap around shelf. So I took my inspiration from a traditional rolltop desk. This provides both the main desk as well as the additional height at the front of the desk on top which a shelf could be added. By using a frame and panel design should help to save some wood and give a more "craftsman" look to the desk. The shelf/ledge will project 7" in front of the desk, and 4" behind with ~1" over the front panel for a total of ~12 inches of usable room. The wrap around will only extend about 20-24" from the front of the main ledge. This allows the ability to use the traditional side panel design of the rolltop desk. The desk needs a single pullout keyboard drawer, though I'm undecided if I will attempt to put additional drawers down the left side in order to add some additional mass to the desk to counterbalance the ledge on the front (in case something heavy is placed on it).

I didn't have time to draw up a complete dimensioned drawing, however I'm going to base most of the design off some drawing for a rolltop desk that appeared in Fine Woodworking magazine a few years ago - "Building a Roll-Top Desk" by Kenneth Baumert. However I don't plan on making it modular nor do I plan on using raised panels. I'll be sticking to a more traditional mission/craftsman style.

Front View


Side View

Top View

Unfortunately I was using an antiquated technique - pencil and paper to sketch the desk using a 1/8" scale. For some reason my old scanner doesn't seem to like pencil drawings. The exact sizing of the rails and styles at least in the side view aren't accurate as I still have a few things to figure out.

I'm planning on building the desk out of oak boards that I currently have on hand out in the shop. I'm thinking of finishing it using the same recipe as I used on our mission style sofa and chairs: analine dye, oil stain, shellac and finally polyurethane to protect the finish.

My original idea to save time and money was to put a  single drawer that extends the full width of the desk that would be attached to two heavy duty drawer slides - which is the way the receptionists current desk is built. I'd like to build in a standard set of drawers on the left and have the keyboard drawer extending the rest of the way to the right. I'll have to give it more thought - the downside is it would add another $30-$40 to the hardware part of the budget.

I had hoped to build it over the course of June after my current work deadlines have been met. Unfortunately my current work project has turned into a tortorous nightmare requiring a ton of overtime. So we'll see how far I can get over the rest of the month. There are times that I just need to get away from the computer and get a bit of physical excercise.

Saturday, June 5, 2010

Pencil Post Bed - Completed

Between working a ton of overtime and entertaining my parents for a week and finally trying to recover from a case of bronchitis, I haven't had a chance to post a picture of the completed bed. The following picture is the bed as we set it up in my daughter's room a week and a half ago. I was in a bit of a rush trying to get it together and ready as it was already getting fairly late in the evening so unfortunately I didn't get any pictures of the assembly of the angle iron onto the rails or any of the setup. Just one shot before we tossed on the mattress. You can see all the poplar slats, they are spaced about a 1/2" apart. The bed is rock solid. The mattress comes up just even with the bottom of the headboard. My wife is still working on the quilt, perhaps when she gets that done I'll take a picture of the bed with it and post it.


Sunday, May 23, 2010

Pencil Post Bed - Final Pieces

With the finish applied to the bed, it's time to take care of those last few pieces to complete the bed. Chandra picked up two pieces of 1" angle iron for me from a welding shop in Charlottesville on Friday that screw into the side rails and hold the slats that go across the bed under the mattress. On Saturday morning I picked up some poplar boards from Northland Forest Products in Troy to make the slats for under the mattress. On Saturday aft, we drove into Charlottesville and bought a mattress for the bed. The remainder of Saturday saw me cutting the 4 poplar boards into 20 slats (4 slats I derived from other poplar boards I had on hand).


Mattheus helped me crosscut and rip the boards to rough size. I jointed one flat face and then jointed one side. Then Johannes helped me plane them to final thickness. I have to admit the new dust collector made a huge difference in the amount of mess planing made. I believe the planer works much much better now that it doesn't have to try and push the wood chips out. There were many times that it seemed like we needed to almost push a board through the thing and now it planes without any issues - walnut, poplar and a bit of oak. Thus tool performance has been increased by the dust collector - and cleanup is a breeze.

I used a 3/16" round over bit on all edges of the slats so that there was nothing to catch on the mattress. Wrapped that up around 11:15pm on Saturday night.


I had to drill the screw holes into the angle iron - 12" on center and countersink for woodscrew heads. Chandra was a bit worried or upset. Having never bought steel before she was a little concerned over the surface rust and scale on the material but I assured her that it would clean up fine. To make sure I used 50gt sanding disks on my 4-1/2" angle grinder and cleaned up all the rust and scale and rounded over any sharp corners. We hung em from the garage door track again and gave them a coat of primer - grey Rustoleom and two coats of black paint. I had to space things out a little longer today because the weather would be sunshine one minute and thunderstorm the next. So the humidity was high and the paint/primer was a little slower drying. I needed it done today to give it a good 48hrs of dry time before we had to assemble the bed.


If I understand correctly my dad and step mother will be arriving sometime on Wednesday. I think I can confidently say that they will now have a bed to sleep on. However, my wife is furiously trying to finish up the quilt for the bed. So while they have a bed to sleep on, they might have to wait a few days for the coverings.


I'll post a picture of the bed setup sometime later this week if all goes well.

Friday, May 21, 2010

Pencil Post Bed - Applying the finish

Over the past week and a half, whenever I could slip a few minutes in at night or on the weekend I've begun to close in on the finished bed.

Last weekend I spent a pile of time sanding and adding the profile to the rails. On Monday night we cleaned the garage and hung most of the big pieces by string from one of the garage door rails and began to apply the finish.

Having read a recent article in Fine Woodworking on preventing cherry from getting a blotchy finish - Blotch-Free Cherry I decided to follow one of the suggested courses:

1) Apply a wash coat of diluted shellac - 50% dilution of Zinser Sealer Coat - Wax Free Shellac using 2/3 cup denatured alcohol to 1 cup shellac. See formulas: Mixing Shellac. Though I've never seen it printed on the can, it seems common knowledge that the Zinser shellac's are 2lb cuts so the diluted wash coat is therefore a 1lb cut.

2) Watco Danish Oil - Cherry colored.

We applied the washcoat of shellac on Monday night after cleaning the garage and hanging as much as we could from the garage door tracks.


After 24hrs (mostly because I needed to work all day) I sanded the entire project down by hand using 220gt sandpaper and then gave a quick rub over with Maroon synthetic steelwool.


We then rehung everything and applied the Danish oil using extremely liberal amounts.  Below is a picture of the headboard completely saturated with Danish oil. Due to the washcoat, the Danish oil largley floated on top.


We followed the directions on the can: apply first coat liberally, wait 30min, apply second coat, wait 15min and wipe off access using lint free "t-shirt" material cotton painter's rags. It was amazing how much rubbed off. The bulk of the red coloring wiped right off but enough stayed behind to give a pleasing brown hue with a slight tint of red. I had to keep going out to the garage every hour or so for the first few hours post application in order to wipe everthing down one more time to ensure that any oil that seeped out of the pores of the wood was removed.


I'm currently torn as to whether to apply a coat of poly or paste wax or just leave as is. I've a ton of  programming to do at work this weekend, plus I need to drill the angle iron for the side rails, cut and plane the poplar for the slats and buy a mattress. All before Tuesday. The finish feels smooth as a glass right now and its been curing this Tuesday night. We'll see if we apply the poly or not.

Sunday, May 9, 2010

Pencil Post Bed - Getting closer

This weekend was a productive weekend in terms of making some progress on the pencil post bed. I managed to put in the 1/4" filler at the bottom of the rail mortises to fix the little mistake I made last weekend. I glued them up on Friday night and then on Saturday I trimmed down the excess with a small handplane and sanded them flush. I spent an hour or so paring the spacer down to get a good fit on the rail tenons.  With the mortises properly fitted to the tenons on the rails,  I did one last check of the rails and verifed the inner and top faces and marked them accordinly.


I then proceeded to drill and counter bore the bed bolt holes in each of the posts. I laid out the holes taking careful consideration that the difference in thickness of the rails. Using the drill press and the fence on the drill press to make sure that I was accurately centered for each hole, I drilled the larger 1" hole, 7/8" deep and then bored through at 7/16" diameter. The larger hole is for the bed bolt head and the smaller for the 3/8" bolt to slide through. The holes had to be offset so that the bed bolts don't intersect. The holes for the head and foot rails are the same distance down from the top of the rails (1-1/8") as the holes for the side rails are up from the bottom rails.


With the holes drilled in the posts, I bored the hole into the inside of each rail where the bed bolt nut will sit using the drill press using the same 1-1/8" spacing either from the top or the bottom of the rail depending on which rail I was drilling. These holes are 3" back from the end of the rail (excluding the tenon).  These are not through holes, so I used the depth stop on the drill press to prevent going any further then neccessary. I then placed the rail on the top of my worktable and tenon into the post mortise. Then using the hole previously drilled into the post as a guide hole I strarted drilling the 7/16" hole through the end of the rail. I had to finish drilling the hole by without the post as the depth of the hole was pretty much the maximum drill length of the drill bit after the post was removed.


Wi all the holes drilled and tested we moved the parts outside onto the driveway and did our first full assembly with the bed bolts. Mattheus gave me a hand assembling and Shae-Lynn acted as crew foreman. With the bed out of the way and assembled in the driveway I could verify the measurements for the tester frame (the frame that goes around the top of the bed).

After cutting and planing the frame rails and using the dado blade I cut the half lap joints into the ends of both the long rails and the short rails. I cut the dados into the long rails for the two short center rails. Unfortunately it was getting late so we moved the bed into the garage and re-assembled around my work table.  The final frame is shown below.


There is one final piece of woodworking to do before sanding and finishing the bed. I need to cut the profile on the outside of the top of each rail. I still need to purchase the 2 angle iron pieces to go along the inside of the side rails and then cut and plane the poplar cross boards that the mattress sits on. I figure those boards can be created after the rest of the bed is finished unless time presents itself. I'd rather get the finish on the bed before I turn to those pieces since they don't require finishing and can probably be done in an evening or two - I think there is about 20 of them to make.

Saturday, May 1, 2010

Pencil Post Bed - Fitting Rails and Cutting Headboard

I finally got a chance to get back at the pencil post bed that I'm making for my daughter. The pressure is on, I have 25 days to get the bed complete, however, I also have a massive deadline at work. If I don't make significant progress today and hopefully finish off the woodworking next weekend I'm in big trouble. The day saw great progress on a number of fronts and a two minor errors on my part because I was rushing myself. One is a fixable mistake and the other is one where if you didn't know it wasn't supposed to be that way, you wouldn't know it existed.

I started the work last night actually, by laying out the mortises on the posts and doing basic prep work for today. The day started by cutting the mortises in the posts beginning with the 8 rail mortises - 3/4" wide, 3/4" deep by 3-1/2" long. That was the first mistake - the 3-1/2" long. It was what was called for on the drawing but I had completely forgotten that I had to make a minor compromise when sizing the rails and wound up with rails that were 3-1/4" high - not the 3-1/2" that were called for in the plans. It is a fixable error, I'll need to glue in a 1/4" piece into the lower end of each mortise slot, this won't be visible in the finished bed since it will be hidden by the rails themselves being 2-1/4" wide. Depending on how well I match the wood, they may not be noticeable at all. I'm still kicking myself in the butt for it but alas not much that I can do now.


Cutting the mortises in 2 passes using the 3/8" chisel, flipping the post end for end to make sure that the mortise wound up dead center.


Cutting the long mortise for the headboard required using double stick tape to put the cut-offs from the tapers back onto the tapered section of the pencil post bed to allow me to cut the mortises along the center line of the post. It took a bit of time to get all 3 sides taped onto each post. Three sides because I needed the bottom to be flat so that the post didn't tip while cutting the mortise and two sides so that I could flip the post around and cut the mortises in two passes just like I did for the rail mortises above. If you look closely you will see the tapered cut-offs on the sides of the taper at the bottom of the picture.
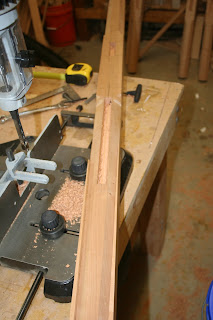

Mortises are complete both rail and headboard mortises. After cutting them, I cleaned up to the final width using a chisel and in the case of the headboard mortise I carefully sanded the long slot on the inside to make sure that the headboard would slide in. It is still a bit tight, I will need to loosen things up just a touch before I do any final finishing and assembly.
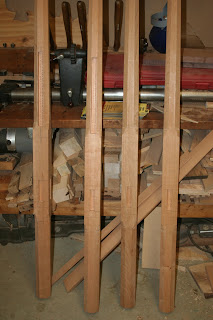


With the mortises complete and the headboard mortises in place I decided to cut the headboard and route it to final shape. I used the bandsaw to cut the rough shape and since the curves were not very tight, I went ahead and used the 1/2" blade that I had in the saw. It worked but I should have used a 1/4" blade instead. I'm running a bit short on 93-1/2" blades as most of my new blades are 105" as I have a riser block to put into the bandsaw. I'm waiting until I either have a need for the riser block or I've exhausted my supply of 93-1/2" blades before switching. That way I don't have a bunch of blades laying around that I can't use after I put in the riser block.
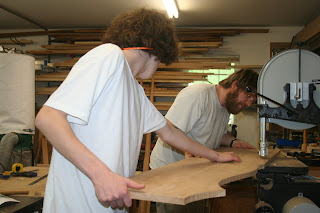


Johannes helped support the board when it hung way off the edge of the table and Chandra made sure she recorded it all with the camera. I didn't take time to take a photo while routing the final shape. I used the template I had made out of 1/4" plywood and used a pattern bit to cut the final shape. The end result was a very smooth cut with almost no sanding required. I still have to sharpen the point on the dip in the center of the profile but that is about it. With the head board completed, we took the time to assemble it onto the posts and show Shae-Lynn what the headboard will eventually look like. I think the bed might be a tad big for such a small girl.
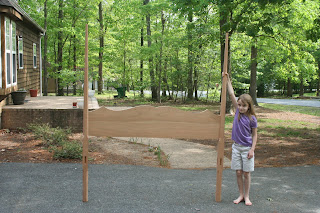

It also appears that I may need to create a matching piece for on top of the profile so that the bed can server dual purpose - head board and stocks when Shae misbehaves. Though I'm thinking I don't really want to have anyone throwing rotten eggs or tomatoes in the house. So alas she may get a reprieve - but when she decided to pose like this it certainly ran through my wife's head - she said it (not me).
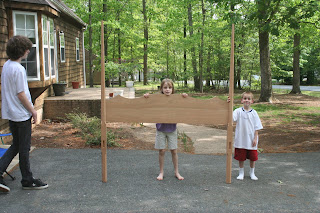


Finally after supper, we cut the rails to length and cut the tenons onto each end using the dado blade, sacrifical fence and a long support on the miter guage. In the rush to finish up, this is where I made my 2nd big mistake. I knew the tenon needed to be 3/4" wide and I knew I put the mortise dead center and for some reason I made the assumption the tenon would be dead center. But alas it was actually supposed to be 1/8" off center. 5/8" to the front of the rail and 7/8" to the back of the rail. This would have given a 1/4" reveal on the front of the posts where the rails met the post and would have made the rails flush with the inside of the post. Now there is a 1/8" reveal on the front and a 1/8" reveal at the back. Not the end of the world and if I didn't write it here, most people would never know it was supposed to be off centered. Functionally it won't make a big difference if any.

I had to fit the rails to the posts using my Lie Nelson medium shoulder plane - the most expensive hand tool I own but it does a really nice job. I use it more than any of the other planes I have.


We finally got it all together for the first visual of what the bed will eventually look like.


We don't have the bed bolts in yet, its simply held together by friction and the two really long pipe clamps I bought when I was building the couch. We decided to leave it up over night so that Shae can see what the bed will look like.

Next weekend I have to drill the bed bolt holes, then refine the fit just a bit. Everything needs to fit a little looser in order to make it possible to assemble and disassemble the bed in the future. I need to build the tester frame for around the top and put in the dowels on the tops of the posts. Need to cut the 20 or so slats I need for under the mattress and I need to find some 1"x1" x 80" angle iron to hold the slats. And of course put the 1/4" spacer in the bottom of the mortises I cut too long. Then lots of sanding, scraping and prep work and then finishing it.

It is going to be a huge challenge to get it all done in the next 25 days. I have a ton of work to do at work that will require me working a lot of overtime over the next few weeks. Time will be tight but at least now that we've made it this far, there is at least a hope that it can be completed.